and the distribution of digital products.
How to Draw Simple Flows Without Any Design Skills
\ Recently I had a project which involved drawing a flow consisting of interconnected blocks. It was quite a complex flow with a lot of blocks of different heights. The image below shows a more or less simplified version.
\
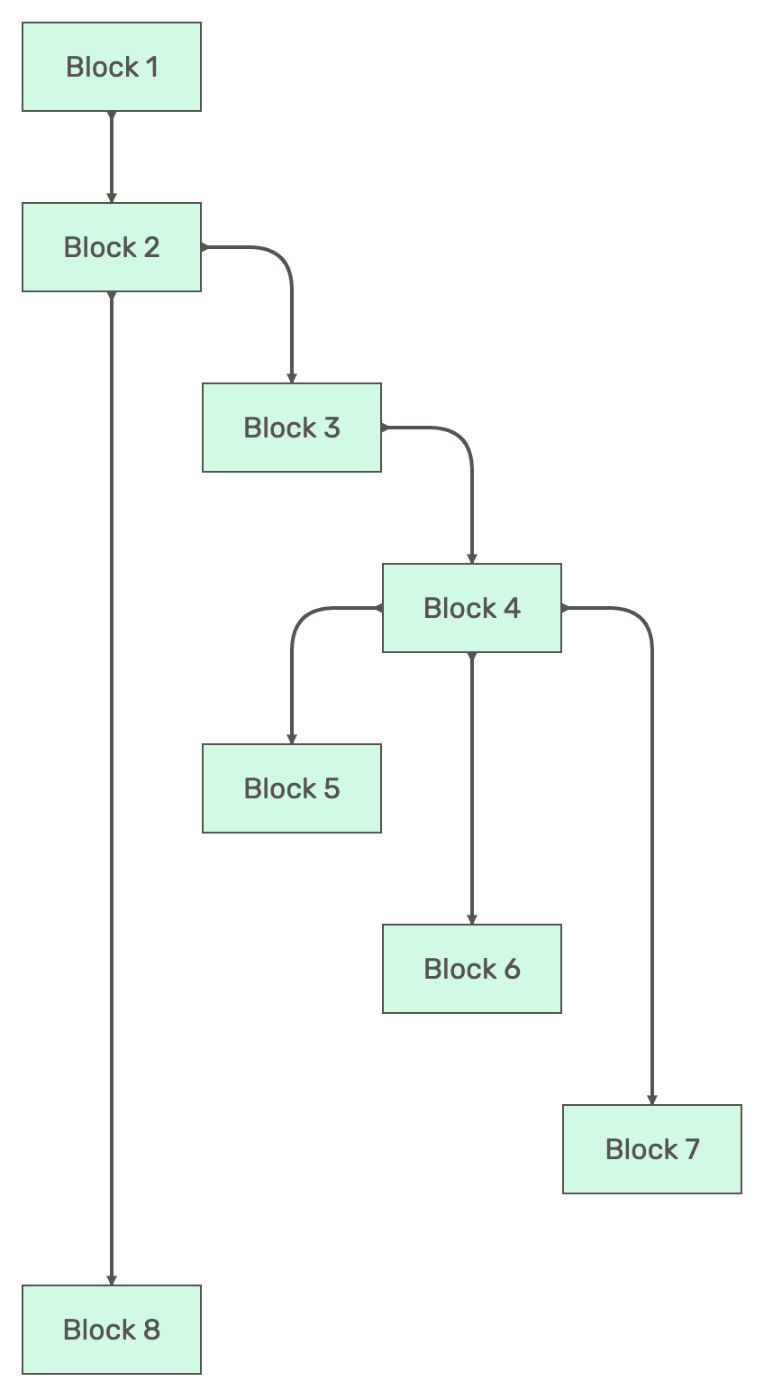
\ Each block could have an arrow coming to the next block reflecting a connection. Some blocks could even have more than one arrow each of them representing a different subpath of a flow.
\n My initial thought was to use the HTML canvas API but the amount of complexity to represent a bunch of blocks with a text and arrows between them wasn't justified. So I decided to stick with a plain old HTML for blocks and SVG to render arrows. With this sort of approach a block is a simplediv of fixed width with a text in it and an arrow is an svg document with a single path.
\ The nature of application imposed some limitations. First of all, there is no data of how many blocks a flow has, how these blocks are positioned on a canvas and how the arrows connect the blocks. Therefore we couldn't have a set of SVG arrows prepared by the design team and simply import them in application. There was no other way but to draw them on the fly. Luckily, SVG is the first citizen in HTML and it is pretty simple to draw arrows by generating an svg path.
\
The anatomy of a path.Let's start with a little bit of a theory. Path element is constructed by using the
\
\
The most important attribute that
\n Line is represented by anL which has a start point and an end point. The following path will draw the line from the point with coordinates of x=0, y=50 and end point with coordinates of x=100, y=150.
\
\ Curve is a little bit more complex. It has 3 points - the end point and 2 so-called control points. Control point describes the slope of the line starting at each point. You can think of it as a hand pulling the string in a certain direction. The engine will simply draw a smooth curve based on Bezier function between these 2 control points.
\
\ We would also need a move action (M) which is a unary operator and has 1 argument - a point where to move a pen. It doesn’t draw any shape but it is useful to change the starting point for the next line or curve.
\
\
Practical approachOkay, now let's put the above theory into practice. Looking at the flow at the start of an article we can make certain assumptions:
- an arrow is a set of lines coming from a certain point and ending in a certain point.
- lines are connected by curves.
\ From that point all you need is to write a couple of functions generating a d string. Generating lines is pretty basic, but for curves it is a little bit more complex. In our case we would need to generate 4 types of curves with a certain radius: a bottom left, a top left, a top right and a bottom right curve.
\
// const bottomLeftCurve = "M 0 0 C 0 2 0 2 2 2" // const topLeftCurve = "M 0 0 C -2 0 -2 0 -2 2" // const topRightCurve = "M 0 0 C 2 0 2 0 2 2" // const bottomRightCurve = "M 0 0 C 0 2 0 2 -2 2"\ The idea here is to generate ending point coordinates and coordinates for a control point.
\
type CurveOptions = { startPoint: Point radius: number curveType: "bottom-left" | "top-left" | "top-right" | "bottom-right" } function getControlPoint({ startPoint, radius, curveType }: CurveOptions) { switch (curveType) { case "bottom-left": { return { x: startPoint.x, y: startPoint.y + radius } } case "top-left": { return { x: startPoint.x - radius, y: startPoint.y } } case "top-right": { return { x: startPoint.x + radius, y: startPoint.y } } case "bottom-right": { return { x: startPoint.x, y: startPoint.y + radius } } } } function getEndPoint({ startPoint, radius, curveType }: CurveOptions) { switch (curveType) { case "bottom-left": case "top-right": { return { x: startPoint.x + radius, y: startPoint.y + radius } } case "top-left": case "bottom-right": { return { x: startPoint.x - radius, y: startPoint.y + radius } } } } function curve(options: CurveOptions) { const controlPoint = getControlPoint(options) const endPoint = getEndPoint(options) return { path: `Q ${controlPoint.x} ${controlPoint.y} ${endPoint.x} ${endPoint.y}`, endPoint } }\ By the way we are using the quadratic Bezier curve (Q) because we need only one control point reaching the same slope at both start and end points.
\n Having the curve function we can then use it to draw more complex shapes together with lines. But because I also needed a way to accumulate the string I decided to have a special classPen encapsulating all the needed logic.
\
export class Pen { private currentPoint: Point private path: string constructor(point: Point) { this.currentPoint = point this.path = `M ${point.x} ${point.y}` } move(point: Point) { const path = `M ${point.x} ${point.y}` this.currentPoint = point this.draw(path) return this } line(point: Point) { const path = `L ${point.x} ${point.y}` this.currentPoint = point this.draw(path) return this } curve(radius: number, type: "bottom-left" | "top-left" | "top-right" | "bottom-right") { const { path, endPoint } = curve({ startPoint: this.currentPoint, radius, curveType: type }) this.currentPoint = endPoint this.draw(path) return this } getPath() { return this.path } private draw(path: string) { this.path = `${this.path} ${path}` } }\ Now it is time to generate the arrows itself. There are a finite number of possibilities. Looking again at the image an arrow could go:
- From bottom, left and right side of the block.
- The end point is always the top side.
- The point originates or terminates always in the middle of a side of the block.
\ This means we can achieve this by writing 3 functions: bottom to top, right to top and left to top.
\ An arrow that goes from the bottom side of source block and to the top side of a target block. This is the most common arrow which corresponds to the following arrows 1 -> 2, 2 -> 8, 4 -> 6.
\
function bottomToTopArrow(options: ArrowOptions) { const { startPoint, radius, endPoint } = options const pen = new Pen(startPoint) /** * Straight line from bottom border of one node to top border of another node. */ return ( pen /** line down */ .line({ x: endPoint.x, y: endPoint.y }) .getPath() ) }\ Here is the function to generate an arrow that goes from the right side of a source block to the top side of a target block. The corresponding arrows are 2 -> 3, 3 -> 4, 4 -> 7.
\
function rightToTopArrow(options: ArrowOptions) { const { startPoint, radius, endPoint } = options const pen = new Pen(startPoint) /** * Shifting to the right and down. Top-right curve. */ return ( pen /** line to the right */ .line({ x: endPoint.x - radius, y: startPoint.y }) .curve(radius, "top-right") /** line down */ .line({ x: endPoint.x, y: endPoint.y }) .getPath() ) }\ And the last one - from the left side of the source block to the top side of the target block. This is an arrow between 4 and 5 blocks.
\
function leftTopArrow(options: ArrowOptions) { const { startPoint, radius, endPoint } = options const pen = new Pen(startPoint) /** * Shifting to the left and down. Arrow with 2 curves (bottom-right and top-left). */ return ( pen /** line to the left */ .line({ x: endPoint.x + radius, y: startPoint.y }) /** line down */ .curve(radius, "top-left") .line({ x: endPoint.x, y: endPoint.y }) .getPath() ) }\ The final touch would be to add a marker to represent a pointer. You can achieve it by adding markers and adding marker-start and marker-end to the path.
\
\