and the distribution of digital products.
Launch a Token on Rootstock: Leverage Bitcoin's Security with Smart Contracts
In this tutorial, you will create and deploy your own Bitcoin-based token on the Rootstock (RSK) blockchain, using the security and functionality of Bitcoin while using Rootstock's smart contract capabilities.
\ By the end of this guide, you will have a working Bitcoin-based token that is deployed on Rootstock and can be interacted with via a decentralized application (DApp). We’ll cover the following:
\
- Setting up the development environment
- Writing a Bitcoin-based token smart contract using Solidity
- Deploying the smart contract on the Rootstock network
- Interacting with your token through a DApp
Before we begin:
- Make sure you have Node.js installed.
- Make sure you have NPM (Node Package Manager) installed.
- Hardhat (Ethereum development environment)
- MetaMask (or any web3 wallet)
- A Rootstock (RSK) testnet account
- Basic understanding of Solidity and JavaScript
\ With all of that ready, let’s dive into the setup.
Step 1: Setting Up Your Development Environment\
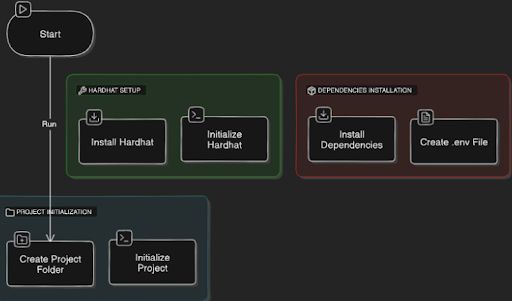
\ First, let's create a new project directory for our token and initialize it as a Node.js project.
\
Open your terminal and run the following commands to create a project folder and initialize the project:
\
\
Next, install Hardhat, which we will use to write and deploy the smart contract:
\
\
Now, initialize Hardhat:
\
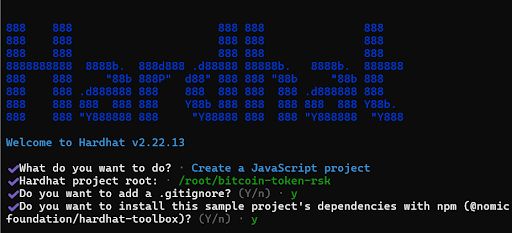
\ Reply to the following Hardhat options when prompted:
\
\ \
what do you want to do: Select Create a Javascript project
Hardhat project root: /root/bitcoin-token-rsk
Do you want to add a .gitignore?: Enter y
Install Project’s Dependencies with npm: Enter y
\
Install other necessary dependencies:
\
\
dotenv will help us manage environment variables, and hardhat-toolbox comes with useful plugins for development.
\
Create a .env file at the root of your project to store your private keys securely:
\
\ Now that our environment is set up, we can move on to writing the smart contract.
Step 2: Writing the Bitcoin-based Token Smart Contract\
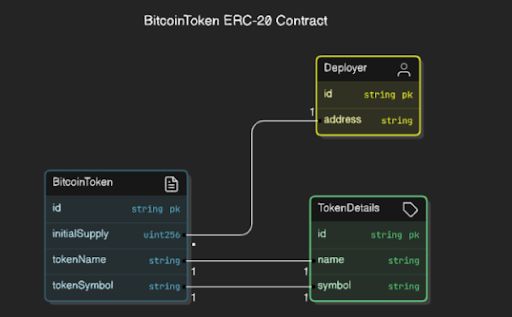
\ \ For this token, we'll write a simple ERC-20 contract in Solidity that adheres to the standard of fungible tokens on Ethereum-like networks.
\
In the root directory, create a new folder called contracts:
\
\
Inside the contracts folder, create a new file called BitcoinToken.sol and add the following contract code:
\
\ This smart contract uses the ERC-20 standard from OpenZeppelin, which is a well-known and trusted library for Ethereum-based contracts. The contract defines a token named "BitcoinToken" with the symbol "BTK" and mints the initial supply to the deployer's address.
\
Install the OpenZeppelin library:
\
\
Step 3: Configuring Hardhat for Rootstock\ We need to update the hardhat.config.js file to configure the Rootstock network and use our environment variables.
\
Open hardhat.config.js and replace its contents with the following code:
\
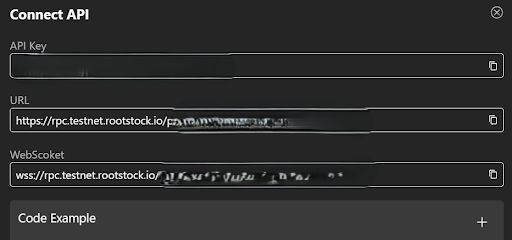
\ Get the URL from your RootstockRPC Dashboard.
\
\ \ This configuration adds the Rootstock testnet and sets the private key from the .env file.
Step 4: Deploying the Smart Contract on RootstockNow that we’ve written the contract, it’s time to deploy it.
\
Inside the root directory, create a new folder called scripts:
\
\
Inside the scripts folder, create a file called deploy.js with the following code:
\
\ This script will deploy the BitcoinToken contract with an initial supply of 1 million tokens, where each token has 18 decimal places.
\
Compile and deploy the contract to Rootstock:
\
\
Once deployed, the terminal will output the contract address. You can interact with this contract using the deployed address and a web3 wallet like MetaMask.
Step 5: Interacting with the TokenWith the contract deployed, we can now interact with it through a DApp. In this section, we will set up a basic frontend to connect to the Rootstock network and interact with the token.
\
Install Next.js and create a new frontend project:
\
\
Install the required web3 libraries:
\
\
Inside the pages/index.js file, modify it to add the following code:
\
BitcoinToken DApp
Connected account: {account}
Token balance: {balance} BTK
This basic DApp connects to MetaMask, retrieves the connected account’s token balance, and displays it.
\
Run the DApp locally:
\
\

\
\
Visit http://localhost:3000 or http://
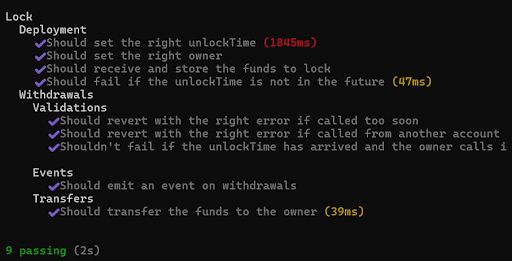
To ensure everything works as expected, we can run some basic tests using Hardhat. Inside the test folder, create a new test file called BitcoinToken.js with the following content:
\
const { expect } = require("chai"); describe("BitcoinToken", function () { it("should return the correct total supply and balance of deployer", async function () { const [owner] = await ethers.getSigners(); const BitcoinToken = await ethers.getContractFactory("BitcoinToken"); const token = await BitcoinToken.deploy(ethers.utils.parseUnits("1000000", 18)); expect(await token.totalSupply()).to.equal(ethers.utils.parseUnits("1000000", 18)); expect(await token.balanceOf(owner.address)).to.equal(ethers.utils.parseUnits("1000000", 18)); }); });\ To run the tests:
\
npx hardhat test\
\ \
Troubleshooting\
If you encounter the following error
\
\ Upgrade Node.js: Upgrade your Node.js installation to version 18 or later
\
nvm install 18 nvm use 18If you encounter the following error
\
\ Move to the bitcoin-token-rsk directory.
\
cd bitcoin-token-rskIf you encounter the following error
\
\ Find the section where you define the "rootstock" network. It should look something like this:
\
module.exports = { networks: { rootstock: { url: "https://public-node.rsk.co", accounts: ["0x your private key here"] // Replace with your actual private key “process.env.PRIVATE_KEY” // or use a mnemonic // accounts: { mnemonic: "your mnemonic phrase here" } } }, // ... other configurations };\ Install the dotenv package.
\
npm install dotenv ConclusionIn this guide, you successfully created and deployed a Bitcoin-based token on the Rootstock network.
\ Visit RootStock official documentation for more information.